Hey Chickadee Ladies!! Its Here!! Its Cute and SO FULL OF CHICKS!! Come check it out on my promotions page by
Simple Dragonfly Garden Card
(Credit to Donna Griffith from #Onstage2020)
Hi Stampers!
Are you ready to start stamping a quite simple card making?!
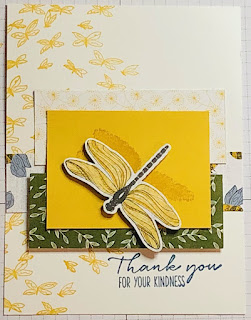
Today we will be making a Dragonfly Garden Card as a “Thank You” Card.
It is quite simple to make this card!
So, far, I am loving this set as this Bundle was my first order from the new January-June Mini Catalog when I attended the November 2020 Onstage.
Attending this Onstage was my first time! I had an AWESOME experience of learning a lot of new techniques and tips for those 3 days!
Thanks to Donna Griffith that showed us of making this cute and simple card!
I believe this card can be for Beginners to Casual Level stampers.
You will need:
Dragonfly Garden Bundle set(Both Stamp set and Punch)
Dandy Garden DSP(Designer Series Papers)
Misty Moonlight (2020-2022 In Color) – 8 1/2” x 5 ½” - Folded Card
Bumble Bee (2020-2022 In Color) – 2 ¾” x 2”
(2) Basic White Cardstock – 5 ¼” x 4” - One Front and One inside
DSP(1) – 4” X 1”
DSP(2) - 3 ¼” X 1 ¼”
DSP(3) - 3 ¼” X 1 ¼”
Dragonfly DSP (Punch out dragonfly)
Bumblebee Ink Pad (2020-2022 In Color)
Stampin’ Seal
Stampin’ Mini Dimensional
Take Your Pick tool
Stampin’ Trimmer
Clear Block “C”
Clear Block “B”
Clear Block "A"
First thing you need to do is to fold your Misty Moonlight with your bone folder to fold the cardstock.
*excuse my bone folder, it is very well used*
Next you will take one Basic White cardstock and stamp on it
Now you Stamp the sentiment on the lower right corner of the card
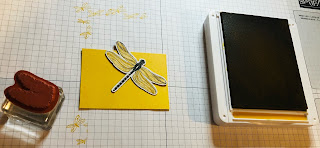
Punch out the dragonfly from the DSP
Then you take the Bumble Bee cardstock(2 3/4" x 2) and stamp the image onto it. You will need your dragonfly to line up of where you want the shadow of your dragonfly
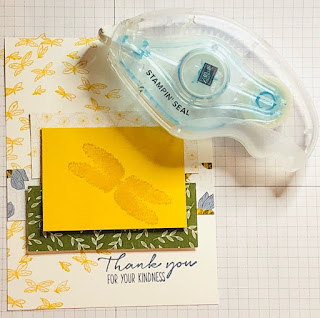
Now we start putting the cards together by using the Stampin' Seal adhesive
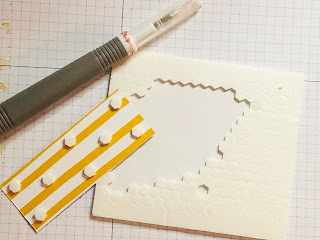
Now on this DSP, you will need to add the mini dimensional on the back
Now it looks like this
Peel the paper of the sticky part
Apply that DSP onto the "bee dsp"
Then you apply the Bumblebee cardstock stamped shadow wing on the card
Take your punched out dragonfly and add the mini dimensional adhesive on the back of it.
Peel the paper off the sticky part and place it onto the Bumblebee cardstock with the stamped shaded wing
Place that whole card that you put together and adhere to your Misty Moonlight folded cardstock
Now you need to add the inside the Basic White cardstock
Now you are finished with your card
Do you want to make this Dragonfly Garden "Thank you
Card"?
Shop with Jan by clicking on the photos below
|
Dragonfly Garden Bundle - 156224
|
Basic White Cardstock - 159276
|
Misty Moonlight Cardstock - 153081
|
|
|
||
|
|
||
|
|
||
|
|
|
|
|
|
||
|
|
||
Dragonfly Garden Stamp Set - 154411 |
Dandy Garden & Memories & More - 154301 (Extra Suggestion)
|
The New Mini Stampin' Cut and Emboss Machine is Here!! It's cute and Sleek. Its a fold up machine that you can tuck in somewhere that can fit on your desk. Or in fact you can travel with it to anywhere! You can order your new Mini Stampin' Cut and Emboss machine here For only $60.00. Unfortunately we are no longer selling the magnetic plate to go with your machine.
It's Here! You will find that I have added the new Catalogs of January - June Mini Catalog and as well for SAB Catalog! You can find them in either on the front page of this blog on the side or you can go to my catalog to download your digital catalogs! If you prefer to have a catalog in hand, go to my Request a catalog on the top of page or click here .
Hello Stampers!
Welcome to Jan's Inspiring Stamper!
Coming Soon with more post when this website is setup!! Thank you for your patience.


No comments:
Post a Comment